Hey guys, sorry it's been a while since I've updated. I've been so busy the last few months. Waiting to hear back from grad school (with disappointing results I must say), finishing the semester, looking for a job in the restaurant business and training for a 5K run! So lots have been on my plate but I will hopefully have more time to blog.
It must be a sign, not getting into grad school that pushed me another step closer to fulfilling my dream of becoming a pastry chef. I have been in search of an apprenticeship and seems to have found one but I will post more on that later when I officially get it! And as to the 5K, I started training for it the beginning of summer and finished 2 days ago in the SF Marathon at 34 minutes in my first ever 5K race! It's definitely addicting for those who has never ran in a race..or hardly ever run. Between making all these treats and constantly eating, I need to run and stay in shape.
So, back to the main post...summer comes and goes a little more quickly than we all hope. Especially for those of us living in the Bay Area where the heat rarely settles for longer than 3 days at a time, it's hard to imagine it being summer when it's gloomy and 60 degrees outside. Nonetheless, I have been making ice cream. I have been trying out a recipe that I like for strawberry ice cream and I daresay that I am pretty darn close to a really good one.
I know it's pretty close to the end of strawberry season but, I still can't get enough. Last week, I bought half a flat for $6 at farmers market so I've been trying to figure out what to do with all those strawberries. Atlas, my friend has graciously lent me her ice cream maker so I have been making a whole lot of strawberry ice cream. YUM!
Speak no more. Here's the recipe I've been using:
Inspired by David Lebovitz's vanilla ice cream recipe
Strawberry Mix-in
2 Pint's fresh strawberries, hulled and quartered
1 cup granulated sugar
Cook the strawberries and sugar in a medium sauce pan until it has thickened on low heat to make sure it doesn't bubble over. Once cooked, strain the strawberries from it's juice and separate into two bowls and let cool completely.
Ice cream base
1 cup whole milk
A pinch of salt
1/4 cup granulated sugar
5 egg yolks
1/2 cup whole milk + 1 1/2 cup cream*
Heat the milk, salt, and sugar in a saucepan for about 10 minutes until the milk is hot.
Set up an ice bath by placing a 2-quart bowl in a larger bowl partially filled with ice and water.
In another bowl, stir together the egg yolks. Gradually pour the milk into the yolks to temper, whisking constantly as you pour. Scrape the warmed yolks and milk back into the saucepan. Do not pour the hot milk into the eggs at once! It'll curdle and you'll end up with scrambled eggs.
Next, return the saucepan with the custard to the stove and heat over low fire stirring constantly and scraping the bottom with a heat-resistant spatula, until the custard thickens enough to coat the spatula. Strain the custard into the heavy cream. Stir over the ice until cool, then refrigerate to chill thoroughly.
Lastly, freeze the custard in your ice cream maker according to the manufacturer's instructions. Halfway through, mix in the strawberry juice. When your ice cream is done, mix in the cooked strawberries, spoon into a container and allow to freeze for a few hours. Soften it a bit before serving with your favorite toppings!
*I found that half and half is a little too watery and becomes icy when frozen but if you don't mind the fat, go ahead and use 2 cup cream.
Tuesday, July 27, 2010


Friday, March 5, 2010
French Macaron Obsession
It seems that everyone these days are obsessing over the infamous French Macaron. Slightly crunchy on the outside, soft and chewy on the inside. Not those excessively sweet coconut blobs that Americans eat. I'm talking about the real deal. What I love about the Macaron is the plethora of flavor combinations.

The base of the macaron consists of egg whites, almond meal, and powdered sugar. All of which is relatively flavorless. You can add almost any flavor you like, as long as you pair the wet and dry ingredients correctly. As you might already know, this is a meringue cookie, made from egg whites. Egg whites are tricky to work with because if you don't do it correctly, they will not become meringue but just egg whites and really hard when they come out of the oven.
 I got this book as a gift from a friend that I absolutely LOVE, called I Love Macarons by Hisako Ogita. She has done this macaron in several ways, giving you fool proof methods for making the macaron. She also teaches you how to make some of the fillings, giving you ideas, and what possibly when wrong in the process if your macaron fails. It is one of the few books in English on how to make these little devils. Most other books are in French so unless you speak French then, this is your book.

Before I got started with making these, I did a bunch of research on recipes and the best way to make them, and the flavor possibilities. Realistically, meringue can be made in several ways and I think you have to just find what works for you. This is what I found to have worked for me.
Here's a list of basic ingredients and equipment you'll need:
1 1/2 cup powdered sugar
1 cup whole almonds
3 egg whites
food coloring
Piping bags
A piping template, this one, I found on the internet but you can also trace your own using something round about 1 1/2 inches
A food processor
Electric mixer
Grind 1 cup of the confectioners’ sugar and almonds in a food processor until powdery, about 3 minutes. Sift mixture through a medium mesh strainer into a piece of parchment paper, then discard any large pieces of nuts that didn’t come through the strainer.
For the flavoring, I did two different batches (shown below) one green tea and one hazelnut mocha. Using a matcha powder that can be found in most Asian markets and a cocoa powder, about 1/4 cup each, add to the sugar and almond mixture when sifting so it is even. Always add dry ingredients to the powder and mix evenly and wet ingredients like food coloring to the meringue before combining the two to get the batter.
With an electric mixer, beat the egg whites and salt until they hold firm but not dry peaks, about 2 minutes. Gradually add the remaining 1 cup confectioners’ sugar, a table spoon at a time, scraping down the sides of the bowl as needed; this can take up to 3 minutes. Beat for an extra 30 seconds until the peaks are firm and shiny but still not dry. Fold the nut mixture gently into the egg whites with a large rubber spatula from the middle out (about 50 times).


Spoon mixture into a piping bag with a ½ inch tip and pipe onto parchment lined baking sheet. Set aside for 30 minutes before baking.
I used a pint glass to hold my piping bag in between different sheets.
Preheat oven to 325 degrees F.


Bake macaroons until set and puffed, about 18 to 20 minutes. Cool for 5 minutes then peel from paper and let cool completely. Sandwich 1 teaspoon filling between two same sized cookies.
When done correctly, it should have that cute little foot. Here for the fillings, I used a butter cream filling and added matcha powder to it after the butter cream is finished and for the hazelnut mocha, I used a ganache with instant coffee granules dissolved into the chocolate. The combinations are limitless so have fun!

The base of the macaron consists of egg whites, almond meal, and powdered sugar. All of which is relatively flavorless. You can add almost any flavor you like, as long as you pair the wet and dry ingredients correctly. As you might already know, this is a meringue cookie, made from egg whites. Egg whites are tricky to work with because if you don't do it correctly, they will not become meringue but just egg whites and really hard when they come out of the oven.
I got this book as a gift from a friend that I absolutely LOVE, called I Love Macarons by Hisako Ogita. She has done this macaron in several ways, giving you fool proof methods for making the macaron. She also teaches you how to make some of the fillings, giving you ideas, and what possibly when wrong in the process if your macaron fails. It is one of the few books in English on how to make these little devils. Most other books are in French so unless you speak French then, this is your book.Before I got started with making these, I did a bunch of research on recipes and the best way to make them, and the flavor possibilities. Realistically, meringue can be made in several ways and I think you have to just find what works for you. This is what I found to have worked for me.
Here's a list of basic ingredients and equipment you'll need:
1 1/2 cup powdered sugar
1 cup whole almonds
3 egg whites
food coloring
Piping bags
A piping template, this one, I found on the internet but you can also trace your own using something round about 1 1/2 inches
A food processor
Electric mixer
Grind 1 cup of the confectioners’ sugar and almonds in a food processor until powdery, about 3 minutes. Sift mixture through a medium mesh strainer into a piece of parchment paper, then discard any large pieces of nuts that didn’t come through the strainer.
For the flavoring, I did two different batches (shown below) one green tea and one hazelnut mocha. Using a matcha powder that can be found in most Asian markets and a cocoa powder, about 1/4 cup each, add to the sugar and almond mixture when sifting so it is even. Always add dry ingredients to the powder and mix evenly and wet ingredients like food coloring to the meringue before combining the two to get the batter.
With an electric mixer, beat the egg whites and salt until they hold firm but not dry peaks, about 2 minutes. Gradually add the remaining 1 cup confectioners’ sugar, a table spoon at a time, scraping down the sides of the bowl as needed; this can take up to 3 minutes. Beat for an extra 30 seconds until the peaks are firm and shiny but still not dry. Fold the nut mixture gently into the egg whites with a large rubber spatula from the middle out (about 50 times).


Spoon mixture into a piping bag with a ½ inch tip and pipe onto parchment lined baking sheet. Set aside for 30 minutes before baking.
I used a pint glass to hold my piping bag in between different sheets.
Preheat oven to 325 degrees F.


Bake macaroons until set and puffed, about 18 to 20 minutes. Cool for 5 minutes then peel from paper and let cool completely. Sandwich 1 teaspoon filling between two same sized cookies.
When done correctly, it should have that cute little foot. Here for the fillings, I used a butter cream filling and added matcha powder to it after the butter cream is finished and for the hazelnut mocha, I used a ganache with instant coffee granules dissolved into the chocolate. The combinations are limitless so have fun!
Tuesday, February 23, 2010
Hot Chocolate on a Stick!
Recently, I've been on a sewing and crafting kick so I've been surfing the internet for ideas of things I can make. A while back, I actually came across Giver's Log and saw this idea I've been wanting to try. I made adjustments but you can find the original recipe here. I think it makes a perfect party favor or addition to a gift. Something homemade and thoughtful!
 Materials you'll need:
A silicone ice cube tray (I tried the Ikea ones that were really cute btw, but because it's plastic and not silicone, I had a tough time getting it out!)
Lollipop sticks - you can find these at your local craft store but you can also use regular craft sticks that can also be found at the craft store
8oz of bittersweet or semi-sweet chocolate*
1 tbsp instant espresso granules
1/4 cup cocoa powder
1/2 cup powered sugar
Put the chocolate in a double broiler to melt. Once the chocolate is melted, add the instant espresso until dissolved and sift the cocoa powder and powdered sugar into the melted chocolate, in small portions to make sure the chocolate remains smooth, and whisk together to combine. Continue until the sugar and cocoa is all mixed in. At this point, the mixture should be thickened from the sugar and cocoa.
 Pour the mixture into a piping bag or a ziplock bag (and just clip a corner) and pipe into the ice cube tray. Once the ice cube tray is full, put in the sticks and let the chocolate cool for about an hour before putting into the refrigerator for about 10 to 15 minutes to harden. Now it's time to take them out! If you're having trouble taking them out, just dip the tray into hot water and remove quickly just so that the chocolate is soft enough to come out but not melt.
Now its ready for packaging! For mine, I got mini treat bags and just tied a bow on it with ribbon and attached directions.
They're actually quite easy to make and really fun too! For my version, I chose to add coffee to it because coffee is a great compliment on chocolate but others like mint, orange and even chili are good too! If you have plastic spoons laying around the house, just use spoons instead and dip it in a few times to build up layers and let it cool.
I think this is a really fun idea and there's so much you can do with this. Hope you have fun making these!
* I don't recommend chocolate chips simply because most of the time when I melt chocolate chips, something goes wrong and it's because chocolate chips contain emulsifiers which are stabilizers and I think it affects the quality of the chocolate. I like Trader Joe's Pound plus chocolate because it's cheap and much better quality. If you're really picky, you can pick up professional grade chocolates from specialty stores also known as oban wafers (chocolate liquor) but for the purposes of this recipe, a basic block of chocolate is fine since I don't think you can taste a big difference in hot chocolate especially if you're making these for kids!
 Materials you'll need:
A silicone ice cube tray (I tried the Ikea ones that were really cute btw, but because it's plastic and not silicone, I had a tough time getting it out!)
Lollipop sticks - you can find these at your local craft store but you can also use regular craft sticks that can also be found at the craft store
8oz of bittersweet or semi-sweet chocolate*
1 tbsp instant espresso granules
1/4 cup cocoa powder
1/2 cup powered sugar
Put the chocolate in a double broiler to melt. Once the chocolate is melted, add the instant espresso until dissolved and sift the cocoa powder and powdered sugar into the melted chocolate, in small portions to make sure the chocolate remains smooth, and whisk together to combine. Continue until the sugar and cocoa is all mixed in. At this point, the mixture should be thickened from the sugar and cocoa.
 Pour the mixture into a piping bag or a ziplock bag (and just clip a corner) and pipe into the ice cube tray. Once the ice cube tray is full, put in the sticks and let the chocolate cool for about an hour before putting into the refrigerator for about 10 to 15 minutes to harden. Now it's time to take them out! If you're having trouble taking them out, just dip the tray into hot water and remove quickly just so that the chocolate is soft enough to come out but not melt.
Now its ready for packaging! For mine, I got mini treat bags and just tied a bow on it with ribbon and attached directions.
They're actually quite easy to make and really fun too! For my version, I chose to add coffee to it because coffee is a great compliment on chocolate but others like mint, orange and even chili are good too! If you have plastic spoons laying around the house, just use spoons instead and dip it in a few times to build up layers and let it cool.
I think this is a really fun idea and there's so much you can do with this. Hope you have fun making these!
* I don't recommend chocolate chips simply because most of the time when I melt chocolate chips, something goes wrong and it's because chocolate chips contain emulsifiers which are stabilizers and I think it affects the quality of the chocolate. I like Trader Joe's Pound plus chocolate because it's cheap and much better quality. If you're really picky, you can pick up professional grade chocolates from specialty stores also known as oban wafers (chocolate liquor) but for the purposes of this recipe, a basic block of chocolate is fine since I don't think you can taste a big difference in hot chocolate especially if you're making these for kids!
Saturday, February 20, 2010
When life gives you lemons...

...throw them at someone! Just kidding, that would be a waste.
I've been really behind on posting! Eeks! After the holidays, I spent about 3 weeks traveling Southeast Asia (Singapore & Malaysia), China and Hong Kong on a primarily food tour. And on a somewhat related note, Southeast Asia has these mini limes that are about the size of a gumball and has a really sweet and tangy flavor within the sourness. Anyway, I'm back and I promise this year, there will be more recipes and posts!
Most people have a lemon tree which is really handy to have around when you're cooking but what do you do with those extra lemons? I could think of at least a million things to do with them. Lemon Pound Cake, Blueberry Lemon Muffins or Scones, and Lemon Coconut Cupcakes are just a few but those recipes only call for a small amount of lemon juice and/or zest off your tree. A recipe I love is Lemon Curd, something that I keep in my refrigerator.
What is Lemon Curd? It is sweet and sour in taste, creamy and buttery in texture and the fragrance is intoxicating. And what do you do with it? It's most commonly used in a classic French dessert called Tarte Au Citron, where a flaky tart crust is filled with the lemon curd and baked, then served chilled. Delicious. The English eat it on English muffins, toast, or scones.
I love making this and having it around because I think its a great way to start off your day with something fresh and light. It's the perfect ZING! to get a great day started, and I usually spread it over a slice of toast.
Got a ton of lemons and don't know what to do? Then lets get started!
The materials you'll need:
 (1) 8oz jar per batch. This recipe makes approximately 1 jar but hey, if you've got a ton of lemons, make several batches, can them, and they will keep for a darn long time inside or out of the refrigerator.
*I haven't tried it yet, but theoretically, if you pasteurize the curd it shouldn't need to be stored in the refrigerator. Just follow the canning instructions.
Ingredients:
1/2 cup freshly-squeezed lemon juice *
grated zest of one lemon
1/2 cup granulated sugar
2 large eggs
2 large egg yolks
3 oz butter, cubed
In a medium saucepan whisk the lemon juice, lemon zest, sugar, eggs and egg yolks over medium heat until the mixture is thick enough to coat the back of a spoon. Next immediately remove from heat to prevent curdling and continue to whisk. Now, begin whisking in the butter, about 1 tbsp at a time until all the butter has melted.
Before the curd cools, put a sieve over a jar and fill. The sieve will ensure a smooth creamy consistency to remove any lumps in the mixture. Once the curd cools, it becomes harder to strain it through the sieve. Now, it is ready for canning (completely optional). If you're just make one batch that you're going to eat right away then just let it cool, and put in the refrigerator. It is probably best to eat it within a week or so but I've kept it much longer in the refrigerator and it still tastes delicious.
Enjoy!
* Depending on what kind of lemon you have on hand, you may need to adjust the sugar. I typically love using Meyer lemons for this because it has a much more fragrant flavor and also sweeter and Eureka lemons tend to be more sour so I would suggest adding about 1/8 to 1/4 cup extra sugar to sweeten.
Sunday, December 20, 2009
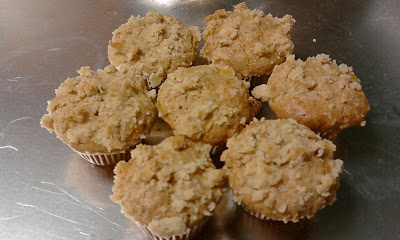
Mini Peach and Ginger Muffins + a Streusel top
I think this is more of a whatever's-in-the-fridge muffin. I had a recipe and didnt have everything I needed so I just put in what I could find to substitute. Outcome? DELICIOUS!
While it's true that baking is a science, and measurements for the most part need to be exact however, there are tricks and more often than not, you can make variations and make substitutions and your product will still be as delicious. It's more important to know your ingredients and what they do in relation to each other so when you make a substitution, you know what can or cannot be substituted.
So the recipe I used is one you can use with any fruit combination. This recipe makes 5 dozen mini muffins and about 1 dozen regular sized muffins.
Preheat the oven to 350 degrees.
2 1/2 cup All Purpose Flour
2 tsp Baking powder
1 tsp Baking soda
1/2 tsp Cinnamon
1/8 tsp Salt
1 1/3 cup Brown Sugar
2/3 cup Vegetable Oil
1 tbsp Citrus zest, minced
1 Egg
1 cup Buttermilk*
2 tsp Vanilla Extract
1 - 14oz can Peaches
3/4 cup Candied Ginger, diced
Combine all the wet (brown sugar, oil, citrus zest, egg, buttermilk and vanilla extract) ingredients in a bowl, and then sift all the dry (flour, baking powder/soda, cinnamon, and salt) ingredients into another medium bowl and whisk in the wet ingredients. After the ingredients are folded in and combined evenly until there are no lumps, you can now add the fruit.
The key to this recipe is being gentle with the batter and not over mixing otherwise the muffins will be really tough and leathery hard.
*I didn't have buttermilk so I used 3/4 cup sour cream I had leftover from a cheesecake I made and a 1/4 cup skim milk so that the batter gets some liquid. What the buttermilk does is make the muffins (or cake) fluffier because there are cultures in buttermilk, as there is some in sour cream. It acts as an acid in the batter so when it gets mixed in with the baking powder&soda, it creates a chemical reaction making the muffins fluffy.
Sorry, just thought you guys wanna know the science behind it. Now you can make substitutions! But with caution...only if you don't have an ingredient. Also, if sour cream isn't an option but you do have milk, take out 1 tsp of milk (from a cup) and replace with 1 tsp vinegar (acidity!) and that will work as well.
So now that your batter is ready, fold in your choice of fruit and you're ready to fill your muffin tins! I use a cookie scoop to help make the batter come off the spoons easier and less of a mess. It also helps make them all the same size and bake evenly.
If you like a Streusel top, now is the time to add it. Recipe as follows:
8 oz Flour
2 oz Sugar
2 oz Brown Sugar
4 oz Butter, cold & cubed
Combine all the ingredients in a small bowl and pinch together butter and flour/sugar with your fingers until you have crumbs. Do NOT over mix it into one big clump or else you have cookie.
Grab a handful (or a pinchful for miniatures) and crumble over the prepared muffin batter in the tin.
Bake for 20 minutes (longer for regular sized, about 25 to 28 minutes) until golden brown. Remove from tray about 5 minutes after taking out of the oven onto a cooling rack and now you're ready to make the next batch.
Here are also some ideas for fruit/flavor combinations:
While it's true that baking is a science, and measurements for the most part need to be exact however, there are tricks and more often than not, you can make variations and make substitutions and your product will still be as delicious. It's more important to know your ingredients and what they do in relation to each other so when you make a substitution, you know what can or cannot be substituted.
So the recipe I used is one you can use with any fruit combination. This recipe makes 5 dozen mini muffins and about 1 dozen regular sized muffins.

Preheat the oven to 350 degrees.
2 1/2 cup All Purpose Flour
2 tsp Baking powder
1 tsp Baking soda
1/2 tsp Cinnamon
1/8 tsp Salt
1 1/3 cup Brown Sugar
2/3 cup Vegetable Oil
1 tbsp Citrus zest, minced
1 Egg
1 cup Buttermilk*
2 tsp Vanilla Extract
1 - 14oz can Peaches
3/4 cup Candied Ginger, diced
Combine all the wet (brown sugar, oil, citrus zest, egg, buttermilk and vanilla extract) ingredients in a bowl, and then sift all the dry (flour, baking powder/soda, cinnamon, and salt) ingredients into another medium bowl and whisk in the wet ingredients. After the ingredients are folded in and combined evenly until there are no lumps, you can now add the fruit.
The key to this recipe is being gentle with the batter and not over mixing otherwise the muffins will be really tough and leathery hard.
*I didn't have buttermilk so I used 3/4 cup sour cream I had leftover from a cheesecake I made and a 1/4 cup skim milk so that the batter gets some liquid. What the buttermilk does is make the muffins (or cake) fluffier because there are cultures in buttermilk, as there is some in sour cream. It acts as an acid in the batter so when it gets mixed in with the baking powder&soda, it creates a chemical reaction making the muffins fluffy.
Sorry, just thought you guys wanna know the science behind it. Now you can make substitutions! But with caution...only if you don't have an ingredient. Also, if sour cream isn't an option but you do have milk, take out 1 tsp of milk (from a cup) and replace with 1 tsp vinegar (acidity!) and that will work as well.
So now that your batter is ready, fold in your choice of fruit and you're ready to fill your muffin tins! I use a cookie scoop to help make the batter come off the spoons easier and less of a mess. It also helps make them all the same size and bake evenly.
If you like a Streusel top, now is the time to add it. Recipe as follows:
8 oz Flour
2 oz Sugar
2 oz Brown Sugar
4 oz Butter, cold & cubed
Combine all the ingredients in a small bowl and pinch together butter and flour/sugar with your fingers until you have crumbs. Do NOT over mix it into one big clump or else you have cookie.
Grab a handful (or a pinchful for miniatures) and crumble over the prepared muffin batter in the tin.
Bake for 20 minutes (longer for regular sized, about 25 to 28 minutes) until golden brown. Remove from tray about 5 minutes after taking out of the oven onto a cooling rack and now you're ready to make the next batch.
Here are also some ideas for fruit/flavor combinations:
- Cranberry-Orange
- Blueberry-Lemon
- Bananas and Walnut
- Cherry and Almond
- Apricots and Almond
- Hazelnut and Milk Chocolate
- Chocolate and Orange
- Peanut Butter and Chocolate Chips
Thursday, December 10, 2009
Holiday Perfection!
I might have mentioned in passing..maybe not...that I'm taking a pastry class at my community college. So anyway, I just finished my practical final exam and aced it so I thought I'd share the recipe here.

Preheat the oven to 350 degrees.
Graham cracker crumbs 1½ C
Butter, melted 5 T
Cinnamon 1 t
Place the graham cracker crumbs, melted butter and cinnamon in a food processor fitted with a steel blade and pulse until combined. Pour into a 9-inch springform pan. With your hands, press the crumbs into the bottom of the pan. Bake for 12 minutes. Cool to room temperature.
Bittersweet chocolate 5 oz
Instant coffee granules 2 T
Chop the bittersweet chocolate and place it in a heat-proof bowl set over a pan of simmering water. Add the espresso and stir until just melted. Set aside until cooled to room temperature.
Cream cheese 1¾ lb
Granulated sugar 1 C
Cornstarch ¼ C
Pure vanilla extract 1 t
Almond extract ¼ t
Kosher salt ½ t
Eggs 3
Sour cream ½ C
Cream the cream cheese, sugar, cornstarch, vanilla and almond extracts and salt in the bowl of an electric mixer fitted with a paddle attachment on medium-high speed until light and fluffy. Reduce the speed of the mixer to medium and add the eggs, 1 at a time, mixing well. Scrape down the bowl and beater, as necessary. With the mixer on low, add the sour cream, and the cooled chocolate mixture. Mix thoroughly and pour into the cooled crust. Bake for 1 hour. Turn the oven off and allow the cake to sit in the oven with the door opened wide for 1½ hours. Take the cake out of the oven and allow it to sit at room temperature, until completely cooled.
Semi-sweet chocolate 4 oz
Heavy cream ¼ C
Finely chop the semisweet chocolate and place it in a heat-proof bowl set over a pan of simmering water. Add the cream and stir until just melted. Set aside until cooled to room temperature.
Remove the cake from the springform pan by carefully running a hot knife around the outside of the cake. Leave the cake on the bottom of the springform pan for serving. Drizzle the ganache over the top of the cheesecake.

Preheat the oven to 350 degrees.
Graham cracker crumbs 1½ C
Butter, melted 5 T
Cinnamon 1 t
Place the graham cracker crumbs, melted butter and cinnamon in a food processor fitted with a steel blade and pulse until combined. Pour into a 9-inch springform pan. With your hands, press the crumbs into the bottom of the pan. Bake for 12 minutes. Cool to room temperature.
Bittersweet chocolate 5 oz
Instant coffee granules 2 T
Chop the bittersweet chocolate and place it in a heat-proof bowl set over a pan of simmering water. Add the espresso and stir until just melted. Set aside until cooled to room temperature.
Cream cheese 1¾ lb
Granulated sugar 1 C
Cornstarch ¼ C
Pure vanilla extract 1 t
Almond extract ¼ t
Kosher salt ½ t
Eggs 3
Sour cream ½ C
Cream the cream cheese, sugar, cornstarch, vanilla and almond extracts and salt in the bowl of an electric mixer fitted with a paddle attachment on medium-high speed until light and fluffy. Reduce the speed of the mixer to medium and add the eggs, 1 at a time, mixing well. Scrape down the bowl and beater, as necessary. With the mixer on low, add the sour cream, and the cooled chocolate mixture. Mix thoroughly and pour into the cooled crust. Bake for 1 hour. Turn the oven off and allow the cake to sit in the oven with the door opened wide for 1½ hours. Take the cake out of the oven and allow it to sit at room temperature, until completely cooled.
Semi-sweet chocolate 4 oz
Heavy cream ¼ C
Finely chop the semisweet chocolate and place it in a heat-proof bowl set over a pan of simmering water. Add the cream and stir until just melted. Set aside until cooled to room temperature.
Remove the cake from the springform pan by carefully running a hot knife around the outside of the cake. Leave the cake on the bottom of the springform pan for serving. Drizzle the ganache over the top of the cheesecake.
Sunday, November 15, 2009
Back with a FABULOUS recipe...Caramel Apples!
I'm back! It's now fall and the season for fresh crisp apples. What's better than homemade caramel apples? NOTHING!
So the reason I've disappeared is I've been at my local community college taking a culinary class called Basic Patisserie. Just as the name suggests, I've been learning, and practicing making basic pastries. Many new things I've learned that I will be sharing soon.
But first I was inspired to do make caramel apples since I first tried the ones at the California Disneyland. Caramel apples is perhaps the funnest and easiest thing to make. You can make them with virtually any topping you like and as many as you want if you're going for the ultimate toothache. From chocolate and marshmallows to gummy worms, nuts and more layers of candies and chocolate.
 Of course, my favorite is an Apple Pie Apple, with white chocolate, brown sugar and cinamon and a little bit of graham cracker crumbs I have pictured here.
The caramel recipe I actually got from Food Network so I didn't make it up myself, BUT what the recipe doesn't tell you is all the secrets of what can go wrong and how to prevent it from all the mistakes I learned the hard way, having never made caramel before. None the less, here it goes:
2 cups light brown sugar
1 cup maple syrup
1/3 cup light corn syrup
1/2 cup heavy cream
4 tablespoons unsalted butter
First, remove the stems from the apples and scrub them under warm water and dry them. I found these great bamboo skewers from an Asian market which I found was perfect because they looked like a pair of those training chopsticks for kids so it has a flat part to it that makes it super easy to hold when you eat. So use these skewers if you can find them (if not lollipop sticks work just fine, and can be found at a local supermarket or arts and craft store in the baking section) and skewer on top of the apple all the way to the middle and place on line a baking sheet with waxed paper, set aside.
Put the sugar, maple syrup, corn syrup, and cream in a saucepan. Bring to a boil over medium-high heat and cook, swirling the pan but not stirring, until the mixture reaches 250 degrees F (firm ball stage) on a candy thermometer. Make sure the temperature does not go past 250 degrees or else it will turn into toffee and be too hard to eat after it cools!! Pull pan from the heat and stir in the butter. Tilt the saucepan and dip and spin each apple into the caramel, covering about 3/4 of the apple. Place on the prepared baking sheet until set.
If you choose to cover with chocolate directly over the caramel, let the caramel cool first so it doesn't mix with the chocolate. For about 8 apples, about a 12oz bag of white chocolate chips will be enough but you can also choose to do it with a block of white chocolate. Heat it over a double broiler but make sure the water is touching the bowl, otherwise the steam will burn the chocolate. Steam is much hotter than the water. After the apples are dipped in the chocolate, roll into a cinnamon sugar and graham cracker mixture so it will stick to the chocolate.
Let the chocolate set and they're ready for eating!
So the reason I've disappeared is I've been at my local community college taking a culinary class called Basic Patisserie. Just as the name suggests, I've been learning, and practicing making basic pastries. Many new things I've learned that I will be sharing soon.
But first I was inspired to do make caramel apples since I first tried the ones at the California Disneyland. Caramel apples is perhaps the funnest and easiest thing to make. You can make them with virtually any topping you like and as many as you want if you're going for the ultimate toothache. From chocolate and marshmallows to gummy worms, nuts and more layers of candies and chocolate.
 Of course, my favorite is an Apple Pie Apple, with white chocolate, brown sugar and cinamon and a little bit of graham cracker crumbs I have pictured here.
The caramel recipe I actually got from Food Network so I didn't make it up myself, BUT what the recipe doesn't tell you is all the secrets of what can go wrong and how to prevent it from all the mistakes I learned the hard way, having never made caramel before. None the less, here it goes:
2 cups light brown sugar
1 cup maple syrup
1/3 cup light corn syrup
1/2 cup heavy cream
4 tablespoons unsalted butter
First, remove the stems from the apples and scrub them under warm water and dry them. I found these great bamboo skewers from an Asian market which I found was perfect because they looked like a pair of those training chopsticks for kids so it has a flat part to it that makes it super easy to hold when you eat. So use these skewers if you can find them (if not lollipop sticks work just fine, and can be found at a local supermarket or arts and craft store in the baking section) and skewer on top of the apple all the way to the middle and place on line a baking sheet with waxed paper, set aside.
Put the sugar, maple syrup, corn syrup, and cream in a saucepan. Bring to a boil over medium-high heat and cook, swirling the pan but not stirring, until the mixture reaches 250 degrees F (firm ball stage) on a candy thermometer. Make sure the temperature does not go past 250 degrees or else it will turn into toffee and be too hard to eat after it cools!! Pull pan from the heat and stir in the butter. Tilt the saucepan and dip and spin each apple into the caramel, covering about 3/4 of the apple. Place on the prepared baking sheet until set.
If you choose to cover with chocolate directly over the caramel, let the caramel cool first so it doesn't mix with the chocolate. For about 8 apples, about a 12oz bag of white chocolate chips will be enough but you can also choose to do it with a block of white chocolate. Heat it over a double broiler but make sure the water is touching the bowl, otherwise the steam will burn the chocolate. Steam is much hotter than the water. After the apples are dipped in the chocolate, roll into a cinnamon sugar and graham cracker mixture so it will stick to the chocolate.
Let the chocolate set and they're ready for eating!
Tuesday, June 30, 2009
Nutella & Fresh Raspberry Cupcakes
I'm not actually going to post pictures because I didn't decorate them and cupcakes don't exactly look fabulous unfrosted. They look like regular cupcakes from the outside. It's not until you bite into it that you get the surprise!
Anyway, here's the recipe:
3/4 pound (3 sticks) unsalted butter, room temperature- replace 2 tablespoons of butter with shortening (optional)
2 cups sugar
5 extra-large eggs at room temperature
1 1/2 teaspoons pure vanilla extract
3 cups flour
1 teaspoon baking powder
1/2 teaspoon baking soda
1/2 teaspoon kosher salt
1 cup buttermilk
1 pint fresh raspberries rinsed and dried
about 3/4 cup Nutella
Preheat the oven to 350 degrees F.
In the bowl of an electric mixer fitted with the paddle attachment, cream the butter and sugar on high speed until light and fluffy, about 5 minutes. Add the eggs, 1 at a time, with the mixer on low speed, scraping down the bowl after each addition. Add the vanilla and mix well.
In a separate bowl, sift together the flour, baking powder, baking soda, and salt. In 3 parts, alternately add the dry ingredients and the buttermilk to the batter, beginning and ending with the dry. Mix until just combined.
Line a muffin pan with paper liners. Lightly coat the raspberries with 1 tbsp of flour. Fill each liner 2/3 of the way with batter. Place one raspberry and about 1 tsp of Nutella on top, in each of the cupcake batter. Now go back and fill the liner to the top. Bake for about 30 minutes, until the tops are brown and a toothpick comes out clean. Allow to cool in the pan for 15 minutes. Remove to a baking rack and cool completely.
This makes about 2 dozen cupcakes.
If you want, you can add a cream cheese frosting which would go well with the raspberry and nutella.
Enjoy!
Saturday, June 20, 2009
Green Tea Cheesecake UPDATED
Hi everyone!
I apologize for having been gone so long. I started interning at the City of Berkeley's Public Health Department and going back to school to take the prereqs for grad school. Meanwhile, I will do my best to update you all with new recipes.
In the past few weeks, I actually went back to modify the recipe I had for the Green Tea Cheesecake. Here's an updated recipe with the changes I made.
For the crust:
1 package (10 large crackers) graham crackers crushed
2 tbsp granulated sugar
3 tbsp butter melted
Preheat oven to 350 degrees and grease a 9in spring form pan. Line the bottom of the pan with parchment paper (optional).
Place graham crackers in a ziplock bag and seal. Use a rolling pin (any thing else heavy will do) and smash the graham crackers until crushed. (Alternative: you can also purchase graham cracker crumbs but they cost a lot more) Place the the crushed graham crackers, sugar and melted butter into a small mixing bowl and combine.
Pour the crust mix into the prepared pan and compress the mix onto the bottom of the pan so that it becomes hard. Place the crust into the oven and bake for 15 minutes until golden brown.
For the filling:
4 - 8oz boxes of Neufchatel cheese
1 1/2 cups granulated sugar
3 tbsp green tea powder
1 tsp pure vanilla extract (NOT the imitation stuff!!!)
4 eggs
Place the cream cheese in an electric mixer and beat on medium high until smooth and creamy. Next, add the sugar and green tea powder and beat until smooth on medium. Add the eggs one at a time and beat until creamy.
Wrap the bottom of the prepared pan with foil, to cover the bottom and the sides. Place the pan in a roasting pan. Pour the batter into the prepared pan. Add boiling water about 1inch up the sides of the roasting pan. Place the pan into the oven and bake for 55 minutes, until the top turns a golden brown.
Take the cheesecake out of the oven and cool for an hour and place in the refrigerator to chill for at least 4 hours. It's best to chill overnight. When ready to serve, take a paring knife in the sides to loosen the cheesecake out of the spring form pan. Remove the cake from the parchment paper and place on a serving plate.
For garnish (not shown above):
1 cup frozen raspberries
1/4 cup granulated sugar
Place raspberries and sugar into a small saucepan and bring to a simmer on low heat. Stir occasionally until mixture becomes a sauce. Pour the sauce into a strainer to remove seeds from raspberries. Let cool and refrigerate. Drizzle over cheesecake to garnish.
Raspberry syrup may be prepared ahead of time.
I apologize for having been gone so long. I started interning at the City of Berkeley's Public Health Department and going back to school to take the prereqs for grad school. Meanwhile, I will do my best to update you all with new recipes.
In the past few weeks, I actually went back to modify the recipe I had for the Green Tea Cheesecake. Here's an updated recipe with the changes I made.
For the crust:
1 package (10 large crackers) graham crackers crushed
2 tbsp granulated sugar
3 tbsp butter melted
Preheat oven to 350 degrees and grease a 9in spring form pan. Line the bottom of the pan with parchment paper (optional).
Place graham crackers in a ziplock bag and seal. Use a rolling pin (any thing else heavy will do) and smash the graham crackers until crushed. (Alternative: you can also purchase graham cracker crumbs but they cost a lot more) Place the the crushed graham crackers, sugar and melted butter into a small mixing bowl and combine.
Pour the crust mix into the prepared pan and compress the mix onto the bottom of the pan so that it becomes hard. Place the crust into the oven and bake for 15 minutes until golden brown.
For the filling:
4 - 8oz boxes of Neufchatel cheese
1 1/2 cups granulated sugar
3 tbsp green tea powder
1 tsp pure vanilla extract (NOT the imitation stuff!!!)
4 eggs
Place the cream cheese in an electric mixer and beat on medium high until smooth and creamy. Next, add the sugar and green tea powder and beat until smooth on medium. Add the eggs one at a time and beat until creamy.
Wrap the bottom of the prepared pan with foil, to cover the bottom and the sides. Place the pan in a roasting pan. Pour the batter into the prepared pan. Add boiling water about 1inch up the sides of the roasting pan. Place the pan into the oven and bake for 55 minutes, until the top turns a golden brown.
Take the cheesecake out of the oven and cool for an hour and place in the refrigerator to chill for at least 4 hours. It's best to chill overnight. When ready to serve, take a paring knife in the sides to loosen the cheesecake out of the spring form pan. Remove the cake from the parchment paper and place on a serving plate.
For garnish (not shown above):
1 cup frozen raspberries
1/4 cup granulated sugar
Place raspberries and sugar into a small saucepan and bring to a simmer on low heat. Stir occasionally until mixture becomes a sauce. Pour the sauce into a strainer to remove seeds from raspberries. Let cool and refrigerate. Drizzle over cheesecake to garnish.
Raspberry syrup may be prepared ahead of time.
Saturday, May 30, 2009
Useful Kitchen Tools
So I thought that it might actually be useful to show what types of tools that are essential to your kitchen if you want to make great pastries. You don't have to have a ton of fancy equipment though you would think that in order to make these great cakes and pastries like the ones you see them make on TV it's actually quite the opposite. There are only a handful of essentials that you must have.
First, a must is a stand mixer. My favorite the KitchenAid stand mixer (Show Below).
It's a bit pricey, but there are a variety of colors and styles. The price range, depending where you go and whether they're on sale or not, can range from $200 - $600. It sounds almost ridiculous to be paying that much for a mixer; however, I cannot stress this enough, it is one of the best investments I have ever made. They also have attachments that you can purchase, from ice cream makers, juicers to meat grinders and pasta rollers. There are also different paddle attachments that come with the mixer including the paddle for making doughs, a whisk and a hook for bread.
Because it is a bit pricey, and you don't want to wait to save up for one, a good alternative is KitchenAid's and mixer, which is also a good choice.
I'm really not trying to advertise for them, but this is the most useful tool. For more information, you can go their website.
Before I get too far ahead, I'm almost certain that you already know that you need measure cups and spoons. Those should be basics that everyone already has so I'm going to just skip ahead to the next most important tool.
Some of things that is almost a must have in the kitchen are baking pans! It's almost a must to have one of each of these items in order to make an assortment of pastries though it most certainly would be nice to have an all in one pan like the KitchenAid mixer which is pretty much an all in one mixer. That way, you storing all these pans would be less of a pain.
When choosing your pans, go for the commercial ones that are made of aluminum for better results. NOT the darker nonstick pans. If you use nonstick pans, your baked goods turn out a darker color. Okay, at this point I'm also guessing that you're thinking, "Ugh, that means I gotta scrape and clean those baking pans when I'm done!" But guess what? WRONG. If you properly grease your pan or line it with parchment paper, cleaning will be a breeze. Just soak it with water, or you can even add some dishwashing liquid to help it degrease and "voila!" you're done!
Now that I've explained the basics of how to choose your baking pans, pictured below are the types of pans you should have.
A spring form pan (to make cheesecakes)
 A bundt pan
 A loaf pan
 A tart pan
 A muffin pan
 A round cake pan (having 2 may be useful when making layer cakes)
 A cookie sheet
 A cooling rack
 Ramekins
 Spatulas

Also among other things, having a food processor is also handy for making pastry doughs like tart crusts and such.
The list could go on and on but those are the most basic tools. But really, once you get started, you'll end up collecting them so there's no need to buy them all at once.
Until then, good luck!
First, a must is a stand mixer. My favorite the KitchenAid stand mixer (Show Below).

It's a bit pricey, but there are a variety of colors and styles. The price range, depending where you go and whether they're on sale or not, can range from $200 - $600. It sounds almost ridiculous to be paying that much for a mixer; however, I cannot stress this enough, it is one of the best investments I have ever made. They also have attachments that you can purchase, from ice cream makers, juicers to meat grinders and pasta rollers. There are also different paddle attachments that come with the mixer including the paddle for making doughs, a whisk and a hook for bread.
Because it is a bit pricey, and you don't want to wait to save up for one, a good alternative is KitchenAid's and mixer, which is also a good choice.
I'm really not trying to advertise for them, but this is the most useful tool. For more information, you can go their website.
Before I get too far ahead, I'm almost certain that you already know that you need measure cups and spoons. Those should be basics that everyone already has so I'm going to just skip ahead to the next most important tool.
Some of things that is almost a must have in the kitchen are baking pans! It's almost a must to have one of each of these items in order to make an assortment of pastries though it most certainly would be nice to have an all in one pan like the KitchenAid mixer which is pretty much an all in one mixer. That way, you storing all these pans would be less of a pain.
When choosing your pans, go for the commercial ones that are made of aluminum for better results. NOT the darker nonstick pans. If you use nonstick pans, your baked goods turn out a darker color. Okay, at this point I'm also guessing that you're thinking, "Ugh, that means I gotta scrape and clean those baking pans when I'm done!" But guess what? WRONG. If you properly grease your pan or line it with parchment paper, cleaning will be a breeze. Just soak it with water, or you can even add some dishwashing liquid to help it degrease and "voila!" you're done!
Now that I've explained the basics of how to choose your baking pans, pictured below are the types of pans you should have.
A spring form pan (to make cheesecakes)
 A bundt pan
 A loaf panA tart pan
 A muffin pan
 A round cake pan (having 2 may be useful when making layer cakes)
 A cookie sheet
 A cooling rack
 RamekinsSpatulas
Also among other things, having a food processor is also handy for making pastry doughs like tart crusts and such.
The list could go on and on but those are the most basic tools. But really, once you get started, you'll end up collecting them so there's no need to buy them all at once.
Until then, good luck!
Thursday, May 28, 2009
Green Tea Cheesecake

So, one day my mom comes home and tells me, "you should make a green tea cheesecake" and I thought about it and was like, "sure why not" since it's not something you could typically find in your local grocery store.
I went to a Japanese supermarket and bought a bag of green tea powder determined to make this cheesecake without an actual recipe. So after doing a bit of research, I came up with the recipe below.
I'm still working on improvements for this recipe so I may update it later on but for now, it's good enough that's worth a try.
For the crust:
1 package (10 large crackers) graham crackers crushed
1 tbsp granulated sugar
3 tbsp butter melted
Preheat oven to 350 degrees and grease a 9in spring form pan. Line the bottom of the pan with parchment paper.
Place graham crackers in a ziplock bag and seal. Use a rolling pin (any thing else heavy will do) and smash the graham crackers until crushed. (Alternative: you can also purchase graham cracker crumbs but they cost a lot more) Place the the crushed graham crackers, sugar and melted butter into a small mixing bowl and combine.
Pour the crust mix into the prepared pan and compress the mix onto the bottom of the pan so that it becomes hard. Place the crust into the oven and bake for 15 minutes until golden brown.
For the filling:
4 - 8oz boxes of cream cheese
1 1/2 cups granulated sugar
2 tbsp green tea powder + extra for dusting
4 eggs
Place the cream cheese in an electric mixer and beat on medium high until smooth and creamy. Next, add the sugar and green tea powder and beat until smooth on medium. Add the eggs one at a time and beat until creamy.
Wrap the bottom of the prepared pan with foil, to cover the bottom and the sides. Place the pan in a roasting pan. Pour the batter into the prepared pan. Add boiling water about 1inch up the sides of the roasting pan. Place the pan into the oven and bake for 40 minutes, until the top turns a golden brown.
Take the cheesecake out of the oven and cool for an hour and place in the refrigerator to chill for at least 4 hours. It's best to chill overnight. When ready to serve, take a paring knife in the sides to loosen the cheesecake out of the spring form pan. Remove the cake from the parchment paper and place on a serving plate.
For garnish (not shown above):
1 cup frozen raspberries
1/4 cup granulated sugar
Place raspberries and sugar into a small saucepan and bring to a simmer on low heat. Stir occasionally until mixture becomes a sauce. Pour the sauce into a strainer to remove seeds from raspberries. Let cool and refrigerate. Drizzle over cheesecake to garnish.
Raspberry syrup may be prepared ahead of time.
Subscribe to:
Posts (Atom)